Sunday, April 25, 2010

A Mini for A Mini


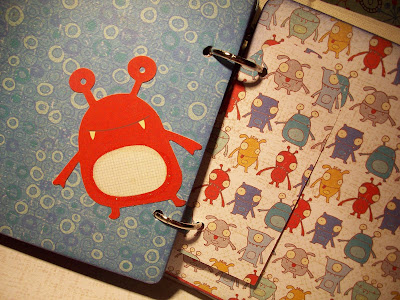
I had so much fun creating my first mini album for a coworker who just had a sweet baby boy! I had purchased a Crate Paper Orbit collection pack and wasn't sure what to use it for...but this was the perfect application! I used a Bo Bunny Bare Naked Chipboard Album and refill pages. I covered all of the pages with the coordinating papers (adding ribbon underneath on the front and back covers to tie the album closed), I rounded all of the corners with my Corner Chomper, sanded and inked all of the edges, and then used my Cricut to cut out tags for journaling or additional photos.

I also made a coordinating card. Who knew aliens could be so cute?


Saturday, April 24, 2010

Cards-O-Plenty

I have been making random cards as needs arise. Here are some of them. There are some beautiful and creative card projects being posted on blogs and You Tube...so I have been doing a lot of scrap-lifting, putting my own spin on things when I can :)

This is my husband's birthday card. In the absolute act of cheesiness, the inside sentiment reads "You Complete Me" - ha!


Paper flowers are a very popular trend right now, so I tried my hand at them. The process itself is quite simple, albeit a little putsy. I made mine by punching 8 scallop circles, crinkling them up, uncrinkling them, then I added a jeweled brad and some Glimmer Mist.


I really think the beauty of these flowers depends on the paper you use, but because of that, you can really adapt them to any project you may have.


I went to a free make & take at Archiver's and made this great chipboard butterfly. I thought it needed a little something, so when I got home I added some clear glass beads on the body and on the flower centers. I then added two strips of sticky strip to tie in the glass bead element to the card front as well.


This card was our March Make & Take for the Stampin' & Scrappin' club at work. The demonstrator at another building did a pink version of the same card in February and I loved the versatility of the design. The image is Stampin' Up!'s large medallion background stamp.


For our February Make & Take, I wanted to use the Stampin' Up's heart treat cups for Valentine's day. I think the effect was very "sweet". We used the punched out heart as an embellishment on the inside of the card.

My coworker asked me to take a stack of cards she had and stamp "happy birthday" sentiments on each. She had a random "congratulations" card that she asked me to turn into a wedding card, so this is what I cam up with. I accented some of the bride's elements with diamond stickles...just to add a little sparkle.

Friday, April 23, 2010

Consistency (or lack therof!)

OK, so I really need to work on posting more often. It is not that I haven't had anything going on, not like I haven't been crafting. I have just been a slacker when it comes to posting what I have been up to. So, time for catchup.

These are some scrapbook pages I completed at a day scrapping retreat. I was very pleased how they turned out. These were specifically for my son's School Days album...pretty obvious, I think!

I kept them pretty themey, but I think that is okay for this sort of layout. Doesn't hurt that the subject is so handsome :)


Friday, February 12, 2010

Pretty in Pink


Howdy,

My coworker asked me to make some baby shower invites for one of her girlfriends. I didn't think too much of it...then she told me she needed 60. Long pause. "OK."

The last time I made baby shower invites (only 50) I designed a super cute card...but it was WAY too tedious to have attempted mass production in such quantities - single handed, at least. I managed last time, but I did not want to put myself through that again. This time I turned to the Cricut.

Luckily my coworker had provided a very cute example of a onesie card that she had found on another individual's blog (unfortunately, she did not provide a link or know the person's name). After researching Cricut's available cartridges, I discovered that the onesie had shape had come from the New Arrival cartridge. Because I wanted to make a card base that opened in the onesie shape (which was not readily cutable from the cartridge itself), I turned to the Cricut Design Studio.

Despite owning the software for well over a year, this was the first time I really sat down and used it for the potential it offered. I was able to take the shadow of the onesie, flip it, rotate it, and weld it. Once I had a card base, I cut the regular onesie shape. I also use the additional hangar and duckie design embellishments.

I took the pink-with-white-polka-dots theme over the top with some white-polka-dotted pink ribbon. I simply attached it to the neck of the cardstock hangar shape with a mini glue dot. I mounted the duckie on a white scallop circle created from a SU! scallop punch. Because it seemed a little flat, I took all of the duckie embellishments and spritzed them with Tattered Angels Glimmer Mist in Marshmallow. Although the pictures don't show it, it added a lot of sparkle. I popped the scallop up using SU! Dimensionals. Then, I added a mini pearl eye to the duckie.

To emphasize the design on the onesie, I used a white gel pen to hand-draw faux stitching along the cut lines.
Overall, I think these have a super cute design...and they could easily be used for a regular baby card. (I would recommend maybe making fewer than 60, however...)

Enjoy...Happy Valentine's!

Saturday, January 30, 2010

Sweets for My Sweet


This is just a very quick post to share the cupcakes I made for my son's birthday treat day at school. I love cupcakes in crafting...stamps, stickers, and paper. But I think that love stems directly from my love of real cupcakes. I mean, who wouldn't love these? :)


The best part about these is that they are fool proof. Follow the directions on the box and you have yourself a tasty treat. One small investment I made last year for my daughter's birthday (less than $10) was a small cake decorating tip set because I made a lot of cupcakes for a cupcake tree. As I did again with these, I took store-bought Betty Crocker frosting, emptied it into a bowl, and using a hand mixer, whipped the frosting for approx. 2-3 minutes. Whipping the frosting makes it a bit lighter and it stretches a bit further.


After the cupcakes cooled completely, I loaded a plastic frosting bag equipped with a decorative tip and swirled away. I also added some sprinkles for some flair.


Yum!

Box-O-Love

Hi there,

I just wanted to share these super easy "Thank You For Coming" treat boxes I made for my work's Stampin' & Scrappin' Club day retreat two weeks ago.

I found a package of 8 window treat boxes at my local craft store...40% off of 2.99 - you can't be that! I also came across some $1 Valentine cling stamps, and provided the fundamental elements to make three 3x3 cards with envelopes - red and pink mats, white cardstock for the stamped image and some Valentine ribbon. I then added a punched scallop with a stamped embellishment on the front.

They were very much appreciated by everyone who came...and they looked pretty cute, if I do say so myself. :)


Sunday, January 10, 2010

Black and White


I decided that I wanted to do a black and white card for our monthly make & take at work. I came up with this card (which I actually created as an anniversary card for a friend).

I had a ton of left over ribbon from a Christmas project that went awry, so I re-purposed it for this card. I used Stampin' Up!'s Whisper White and basic black card stock for the base.

I pulled out the oldie but goodie SU! Little Layers Plus stamp set because I thought it would be a good variety for my make & take participants. I will also use the Teeny Tint Wishes SU! set so thay can customize their card for any occasion.

I love the simplicity and elegance of black and white projects! I plan to try even more in the near future!